
This article is a continuation of a series dedicated to Software Bill of Materials (SBOM) and their practical use cases. The basics of SBOMs and how to generate them can be found in the previous article – A Practical Approach to SBOM in CI/CD Part I – CycloneDX.
What is Dependency-Track?
Dependency-Track is an open-source Continuous SBOM Analysis Platform supported by OWASP. The official description is quoted below:
Dependency-Track is an intelligent Component Analysis platform that allows organizations to identify and reduce risk in the software supply chain. Dependency-Track takes a unique and highly beneficial approach by leveraging the capabilities of Software Bill of Materials (SBOM). This approach provides capabilities that traditional Software Composition Analysis (SCA) solutions cannot achieve.
https://github.com/DependencyTrack/dependency-track
From a practical perspective, Dependency-Track tracks projects and their associated components based on uploaded SBOMs. The platform is consisted of:
- API Server
- Frontend Server hosting static files for UI
Furthermore, the platform utilizes a database to store its data. By default, an embedded H2 database is used, but in a production environment, it is recommended to use PostgreSQL or Microsoft SQL Server.
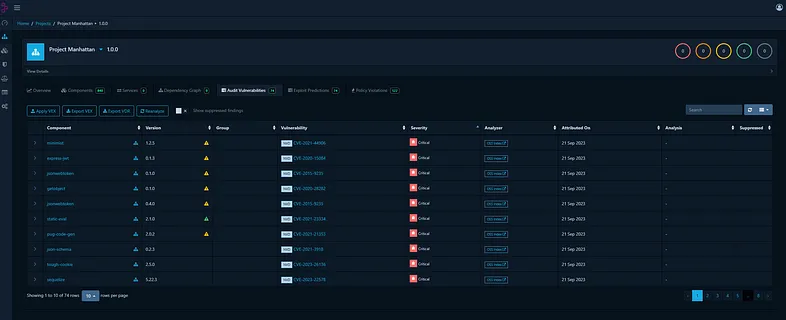
SBOMs can be uploaded through the web application UI or the exposed API. In terms of the API, it can be effectively used to update projects and upload SBOMs created during the CI/CD phase in an automated manner. Below is a representation of a project with identified vulnerabilities based on the provided SBOM:
Moreover, Dependency-Track uses Exploit Prediction Scoring System (EPSS) which is used for estimating the likelihood (probability) that a software vulnerability will be exploited in the wild. EPSS can be used to prioritise remediation efforts.
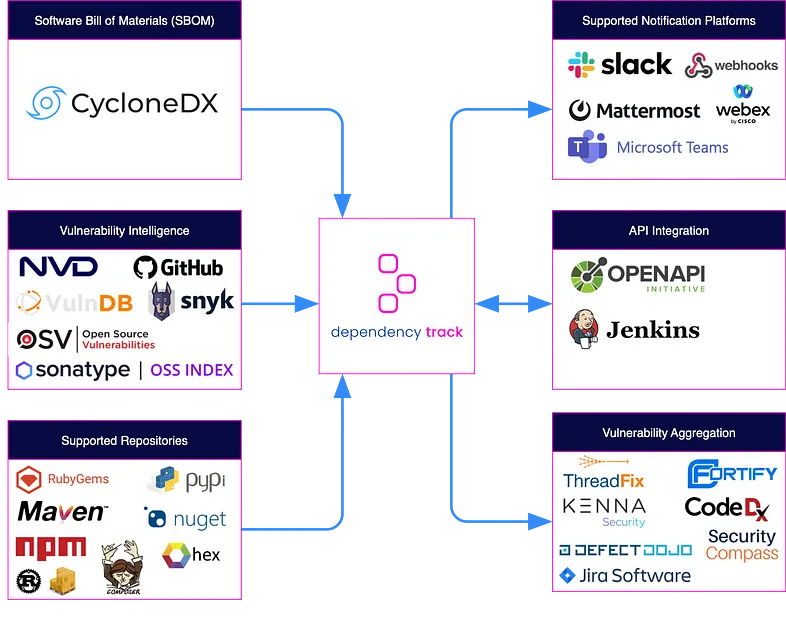
Dependency-Track uses the following vulnerability sources in a default configuration:
- National Vulnerability Database
- GitHub Advisories
- Google OSV Advisories (Beta)
Vulnerability database is updated on a regular basis, every 24h by default.
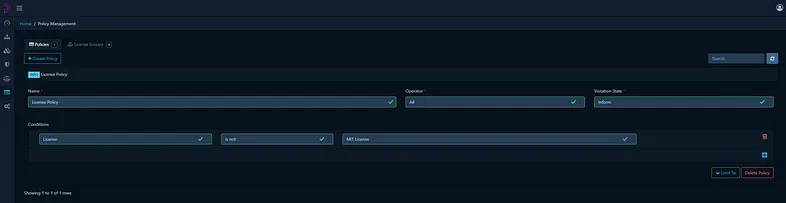
Furthermore, Dependency-Track enables the management of security policies based on various conditions related to vulnerabilities and license properties. The policies allow to notify about any violations. For example, it is possible to create a policy to specify only allowed licenses, as demonstrated below:
Last but not least, Dependency-Track has a number of integrations that makes it a very valuable and effective project from the perspective of implementing a number of processes such as Vulnerability Management.
Deploying Dependency-Track in Development/Local Environment using Docker Compose
As we now have a basic understanding of Dependency-Track, and I hope you’re enjoying it as much as I am, it’s a good idea to take it for a test drive locally!
Actually, the platform can be deployed easily by using Docker Compose provided within the documentation. However, I decided to tweak this Docker Compose to add PostgreSQL database instead of default H2 as it’s not recommended for a production purposes. I’d suggest PostgreSQL also in a development or a local environment to have a replicable environment.
I prepared the below Docker Compose content that can be saved in a docker-compose.yaml:version: ‘3.7’.
version: '3.7'

#####################################################
# This Docker Compose file contains three services
#    Dependency-Track API Server 4.8.2
#    Dependency-Track FrontEnd 4.8.1
#    PostgreSQL 16.0
#####################################################

services:
  dtrack-apiserver:
    image: dependencytrack/apiserver:4.8.2
    depends_on:
      - postgres-db
    environment:
      - ALPINE_DATABASE_MODE=external
      - ALPINE_DATABASE_URL=jdbc:postgresql://postgres-db:5432/${POSTGRES_DB}
      - ALPINE_DATABASE_DRIVER=org.postgresql.Driver
      - ALPINE_DATABASE_USERNAME=${POSTGRES_USERNAME}
      - ALPINE_DATABASE_PASSWORD=${POSTGRES_PASSWORD}
      - ALPINE_CORS_ENABLED=true
      - ALPINE_CORS_ALLOW_ORIGIN=${CORS_ALLOW_ORIGIN}
      - ALPINE_CORS_ALLOW_METHODS=GET, POST, PUT, DELETE, OPTIONS
      - ALPINE_CORS_ALLOW_HEADERS=Origin, Content-Type, Authorization, X-Requested-With, Content-Length, Accept, Origin, X-Api-Key, X-Total-Count, *
      - ALPINE_CORS_EXPOSE_HEADERS=Origin, Content-Type, Authorization, X-Requested-With, Content-Length, Accept, Origin, X-Api-Key, X-Total-Count
      - ALPINE_CORS_ALLOW_CREDENTIALS=true
      - ALPINE_CORS_MAX_AGE=3600
    deploy:
      resources:
        limits:
          memory: 12288m
        reservations:
          memory: 8192m
      restart_policy:
        condition: on-failure
    ports:
      - '8081:8080'
    volumes:
      - 'dependency-track:/data'
    restart: unless-stopped

  dtrack-frontend:
    image: dependencytrack/frontend:4.8.1
    depends_on:
      - dtrack-apiserver
    environment:
      - API_BASE_URL=http://localhost:8081
    ports:
      - "8080:8080"
    restart: unless-stopped

  postgres-db:
    image: postgres:16.0
    restart: always
    user: postgres
    environment:
      POSTGRES_USER: ${POSTGRES_USERNAME}
      POSTGRES_PASSWORD: ${POSTGRES_PASSWORD}
      POSTGRES_DB: ${POSTGRES_DB}
    volumes:
      - pgdata:/var/lib/postgresql/data
    healthcheck:
      test: ["CMD-SHELL", "pg_isready -d ${POSTGRES_DB} -U ${POSTGRES_USERNAME}"]
      interval: 1s
      timeout: 5s
      retries: 10
    ports:
      - 5432:5432

volumes:
  pgdata:
    driver: local
  dependency-track:
    driver: local
Furthermore, the following variables should be stored in .env file locally:
POSTGRES_USERNAME=dtrack
POSTGRES_PASSWORD=dtrack
POSTGRES_DB=dtrack
CORS_ALLOW_ORIGIN=*
It’s important to note that credentials variables should be adjusted and securely stored in both development and production environments. Furthermore, the CORS_ALLOW_ORIGIN variable should be adjusted to match the domain used for hosting Dependency-Track as this will will be used in “Access-Control-Allow-Origin” HTTP header. The use of a wildcard (*) for this HTTP header is not recommended in a production environment. For more information on CORS, you can refer to an article from PortSwigger.
Now, the platform can be spinned by executing the following command in the same directory:
docker compose --env-file .env upAfter a few minutes, the application should be available in http://localhost:8080/. The default credentials are admin:admin.
Deploying Dependency-Track in Kubernetes
The platform can be deployed on K8s with Helm chart managed by the community. At the time of writing this article the latest versions of Dependency-Track container images were utilised and PostgreSQL in version 10.10 was used by the Helm chart.
For the article purposes, I decided to deploy the platform on K8s locally with Minikube. It’s not recommended for a production environment but it’s good enough to present you deploying Dependency-Track to K8s. As my private development setup is based on WSL2, I followed an article Kubernetes Setup with Minikube on WSL2.
After executing a series of commands from the article, I successfully deployed Minikube. In my particular case, I needed to create a cluster with 4 CPUs configured using the Minikube CLI. Additionally, I had to enable the NGINX Ingress addon. Both of these commands are outlined below:
minikube start --cpus=4
minikube addons enable ingress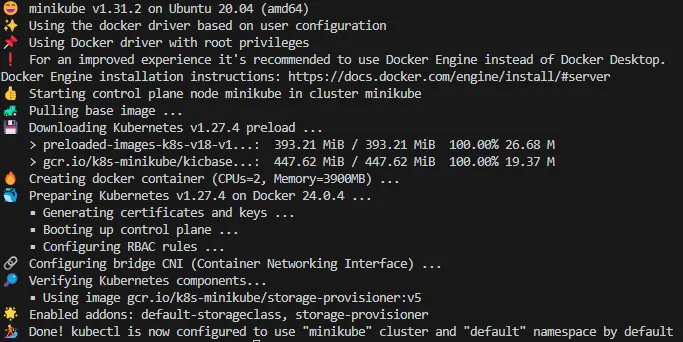
Having a K8s environment prepared, it’s needed to install Helm. Helm is a package manager for Kubernetes. The installation process is described in the official documentation for each distribution.
As we installed all of the pre-requisites, we can start the actual Dependency-Track deployment by executing the following commands:
# add Helm repository with chart for Dependency-Track
# Helm chart is available at:
# https://github.com/evryfs/helm-charts/tree/master/charts/dependency-track
helm repo add evryfs-oss https://evryfs.github.io/helm-charts/

# deploy Dependency-Track in a namespace named dependency-track
helm install dependency-track evryfs-oss/dependency-track \
  --namespace dependency-track \
  --create-namespace \
  --set ingress.enabled=true \
  --set ingress.tls.enabled=true \
  --set ingress.host=kubernetes.docker.internal # adjust the host

# I recommend to override below credentials used by PostgreSQL db in prod
# --set postgresql.postgresqlUsername=
# --set postgresql.postgresqlPassword=
You can notice that I set some chart variables via --set parameters in Helm install command. Those variables can be found in values.yaml.
After executing the commands, you should observe an output similar to the one shown below:
NAME: dependency-track
LAST DEPLOYED: Sat Sep 23 13:54:11 2023
NAMESPACE: dependency-track
STATUS: deployed
REVISION: 1
TEST SUITE: None
NOTES:
Now, let’s verify that the resources were deployed in K8s by running a few commands shown below:
$ kubectl get namespaces
NAME STATUS AGE
default Active 19m
dependency-track Active 2m42s
kube-node-lease Active 19m
kube-public Active 19m
kube-system Active 19m

kubectl get pods --namespace=dependency-track
NAME READY STATUS RESTARTS AGE
dependency-track-apiserver-6b9c86776-djwx8 1/1 Running 2 (2m20s ago) 2m38s
dependency-track-frontend-55c79cdb4c-69rjl 1/1 Running 0 2m38s
dependency-track-frontend-55c79cdb4c-z4t8n 1/1 Running 0 2m38s
dependency-track-postgresql-0 1/1 Running 0 2m38s
The deployment may need a couple of minutes, so be patient. In case of any errors displayed in STATUS column, for debugging purposes I recommend to use the following commands to get logs for the pod:
# get logs for the ${POD_NAME}
kubectl logs ${POD_NAME} --namespace=dependency-track
# get pod details with events shown at the bottom of output
# events section is useful when debugging pod start issues
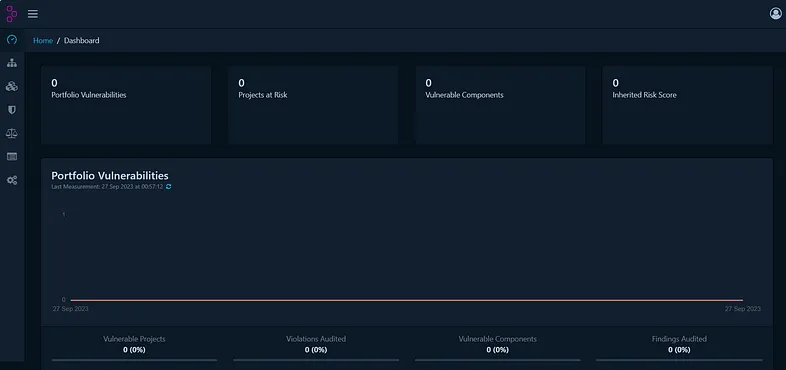
kubectl describe pod ${POD_NAME} --namespace=dependency-trackOnce everything is up and running, you should be able to access Dependency-Track using the designated host via a web browser. In my case, since I opted to run it on Minikube, I had to tunnel the traffic to reach the exposed Ingress controller. This can be achieved by running the command minikube tunnel in the terminal. After completing these steps, I opened the web application in my browser, logged in with the default credentials, and was greeted with the following dashboard:
Summary
In this article, I introduced the Dependency-Track platform, highlighting its capabilities and outlining potential deployment methods using Docker Compose and Helm Charts within a Kubernetes environment. While deploying these methods in a production environment, it is essential to consider additional adjustments. For instance, you may need to obtain a valid HTTPS certificate for Kubernetes Ingress or securely manage sensitive values from secret storage either within files or via CLI. However, those adjustments are very specific to your environment and chosen approach. My primary goal was to provide you with fundamental concepts into how the deployment can be performed.
Let’s summarise the pros and cons of the platform.
Pros
- free and open-source,
- SBOM can be uploaded through UI and API,
- an extensive and well documented API,
- EPSS for prioritising remedial actions,
- a number of integrations supported by the community,
- the UI appears to be considerably more modern compared to other similar solutions.
…and many other features described in the official documentation.
Cons
- consumes and produces only CycloneDX SBOM format,
- requires some deployment and configuration efforts.
I hope you found the information in this chapter valuable and practical. If you have an experience with Dependency-Track let me know how it works for you, I’m be pretty interested about that 🤔.
In the next chapter, I’m presenting how to populate SBOMs into Dependency-Track and explore its API features – A Practical Approach to SBOM in CI/CD Part III — Tracking SBOMs with Dependency-Track.